Archive for the ‘Terrain’ Category

IMG_0564

A lot of people on Twitter have asked me how I went about painting my Sigmarite Mausoleum and so I thought I would post the following quick guide. The colour scheme is based on the box art and follows the same basic colours as suggested on the box. The most important thing here is to paint smart and follow a set order of painting which will make painting a large amount of scenery quicker and more efficient.

Step 1

IMG_0625

Spray the walls Mournfang brown.

Step 2

IMG_0626

Apply a second coat of spray paint. This time more lightly using Incubi Darkness. The aim here is to leave some of the brown showing in the recesses.

Step 3

IMG_0627

Wash the whole thing with Agrax Earthshade. Not only does this provide shading but it also helps to tie the two base colours together.

Step 4

IMG_0637

Apply a heavy drybrush of Thunderhawk Blue (available as a Dry paint), gradually building up the colour.

Step 5

IMG_0638

Pick out any skulls with Rakarth Flesh. Basecoat the ground Stormvermin Fur and pick out any rocks using Gorthor Brown and Mechanicus Standard Grey.

Step 6

IMG_0639

Shade the skulls, ground and rocks using Agrax Earthshade.

Step 7

IMG_0640

Lightly drybrush the whole model using Terminatus Stone.

Step 8

IMG_0641

Now it’s time to pick out the details. I used Deathworld Forest for the plants, Balthasar Gold for the bronze areas, Retributor for the gold and Leadbelcher for the silver.

Step 9

IMG_0643

Wash the plants with Athonian Camoshade and wash all of the other details Agrax Earthshade.

And that’s it. I might go back and add more highlights, drybrush the plants green and pick out the roses but for now it’s more than ready for the tabletop.

In my next post I’ll tackle painting verdigris.

Lord of the Rings Ruins

Over the last few days I have been working on a number of different projects. I have managed to get these ruins finished for Lord of the Rings and continued to work on my Dark Eldar. I had hoped to get more done with the Dark Eldar but the weather conspired against me at the weekend and a combination of high winds and rain meant that I was unable to prime my raiders for painting. Instead, I took the time to work on Space Hulk and started to paint up some genestealers which have been primed and sitting on a shelf looking at me accusingly for a number of months now.

Lord of the Rings Ruins

Below you can see my raiders in their various sub-assemblies. As I plan on airbrushing these I decided to keep them in a number of separate parts to make this easier. However, even if painting by hand it would make sense to paint them as sub-assemblies because of the number of fiddly components that would make certain areas hard to access with a brush.

Raiders sub-assemblies

Here is my first genestealer which was completed a while back as a test model. As you can see, I have gone with the traditional genestealer colours of blue and purple and tried to paint these in a dark moody style like those seen in White Dwarf. I have also tried to get a contrast in textures between the hard carapace and the softer skin by using sharp edge highlights on the carapace and subtle blending on the skin.

Genestealer test model

And here are four of his mates who I was working on over the weekend.

Space Hulk Genestealers

The raiders are going to have to wait until the weekend before I can airbrush them but hopefully I will get a chance to do a bit more work on these guys throughout the week.

-Andy.

Model Trees

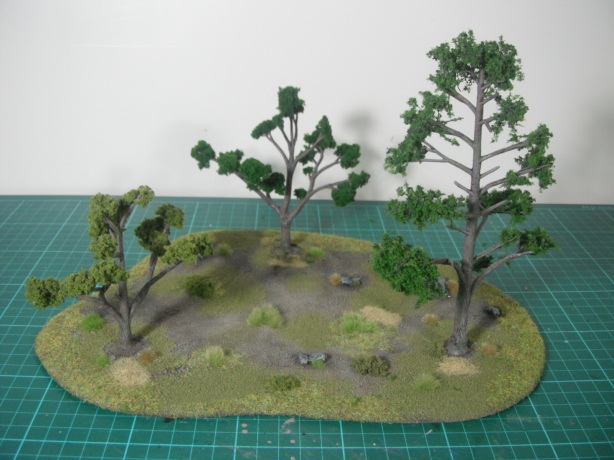
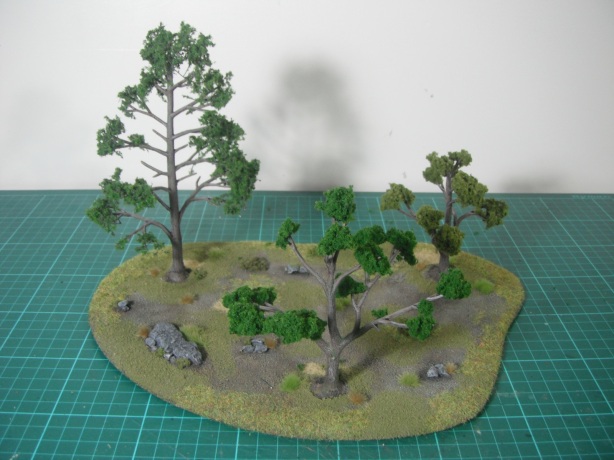
Just a quick update to show some of the terrain I have been working on recently. These trees are made using Woodland Scenics 5-7 inch tree armatures. These are pliable plastic frames which can be carefully bent into shape and produce pretty realistic trees with very little effort.

Once I had cleaned off any mold lines and bent the trees into the desired shapes I glued them to a base cut from MDF and applied a covering of sand to the base. When the glue had dried, a coat of spray varnish was used to hold the sand in place. This is different to my usual method of painting on a layer of thinned PVA over sand but I was worried that the PVA water mix would be absorbed by the MDF and warp the base. The varnish worked really well and the sand remained in place even after some pretty rough drybrushing.

Model Trees wip

The base was painted Steel Legion Drab and heavily drybrushed using Ushabti Bone. Patches of he ground were then washed with thinned Loren Forest to break up any uniformity. The trees themselves were painted Khemri Brown and washed with Agrax Earthshade. They were then drybrushed Codex Grey followed by Fortress Grey and then Pallid Wych Flesh. Once again thinned Loren Forest was applied to the trees in random patches to give the impression of moss or lichen growing on the trunks and branches.

Model Trees

Once everything had dried various flocks, tufts and clump foliage were added to the base to give the impression of a forest floor. The trick here is to use a variety of colours and textures to build up a natural, realistic finish. While doing this I was careful to think about model placement (these are, after all, intended for gaming) and so I wanted to leave some flat areas for models to stand on.

Model Trees

The final stage was to add some foliage to the trees. For this I used Woodland Scenics clump foliage for the two shorter trees and some of their ‘Fine Leaf Foliage’ (a sample of which was included in the kit) for the other, taller tree. I am really impressed with the Fine Leaf Foliage as it gives a fantastically realistic finish. Unfortunately, the kit only included enough for one tree but I will definitely be buying more in future. As with the ground cover, I used different colours of foliage for each of the trees to prevent them from looking too uniform.

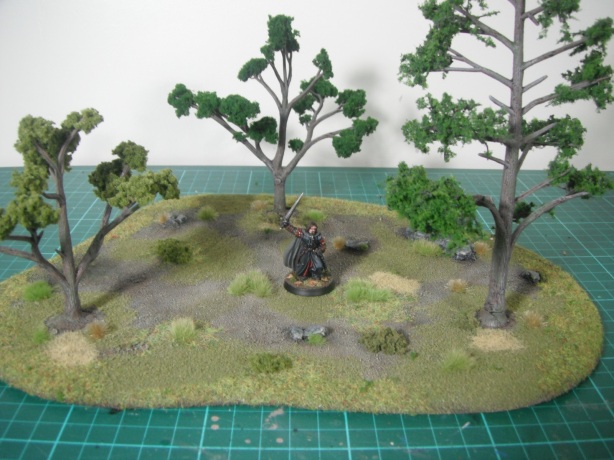
A shot with a model for scale:

Model Trees

The trees in situ on one of my gaming boards:

Model Trees


Battlefield

I wasn’t in the mood for painting yesterday so I decided to work on my terrain. Construction of the boards was completed a while ago so I just needed to flock them and add detail.

I have wanted my own battlefield for years, ever since those early days of reading White Dwarf in the mid-nineties. Back then the hobby had much more of a do-it-yourself approach and the kind of terrain kits produced by GW now did not exist. Therefore the magazine encouraged you to build your own terrain and was full of information on how to go about doing this with minimal cost and easy to get hold of materials. Rather than buy the Realm of Battle Board, which is expensive and not to my taste (the geological layer of skulls is just plain silly in my opinion), I decided to adopt the old school approach and make my own.

Battlefield

The tiles are 2’x2′ squares of think MDF which I acquired for free (although they wouldn’t be that expensive to buy) and the hill was constructed out of insulation foam cut to shape with a hot wire cutter (I think I paid about ÂŁ30 for more insulation foam than I will use on this project). Gaps were filled with Pollyfilla and the whole thing was sanded down with fine grit sandpaper.

Rocks

DSCF4005

Detail was added using Woodland Scenics rock moulds which were cast in plaster. These were glued onto the foam using liquid nails for a strong bond and any gaps were filled using filler. Sand was then glued in place around the rocks to help blend them in to the grassy areas. The grass itself is a Gaugemaster Autumn flock mat which was cut up and glued into place using PVA. Any gaps were then filled by gluing on flock of the same colour and Citadel ‘dead grass’ was glued on in patches to add variety. Detail was then added in the form of various tufts and clump foliage which was concentrated around the rocky areas. Some of the more open areas were kept deliberately clear of tufts so that I would have space to place free-standing terrain on the board later.

DSCF4006

DSCF4007

Although this board is intended primarily for games of Lord of the Rings, when building the basic board I avoided anything which would add scale to the piece. This means that by using different free-standing terrain pieces I can use the board for any game system. Here you can see some Epic models on the board which transforms the rocky hill into towering cliffs.

Epic Battlefield

Middle Earth Battlefield

I have eight pieces of MDF and I plan on using these to build a 6’x4′ gaming area (the largest I can sensibly fit into my dining room) and then use the two spare pieces to create extra tiles to allow for different set ups (at the moment I’m thinking of maybe building a river section with the two spare boards). Now that the hill is done the next few tiles should be a lot simpler. I will post pictures of the tiles as I finish them. Remember, you can follow me on Twitter where I tend to post work-in-progress photos as I work.

Until next time,

Andy.

Inquisitor Necromunda Terrain

Despite being very busy with my new teaching job I have been able to get some hobby time recently. Most of this has been spent with foamcore, plasticard and PVA glue in hand. Here is the first fruit of my labours: a pumping station for use in games of Necromunda or Inq28. Terrain building is an oft-overlooked aspect of the hobby, particularly in these days of GE’s pre-made plastic terrain kits. However, it is something I have recently really started to get into.

The pumping station was just a simple project to get back into the swing of things with terrain making. It is based on the kind of classic 40k terrain that formed the backdrop to all those pictures in White Dwarf I used to spend hours pouring over as a kid. Perhaps this is part of the reason why I love old-school homemade terrain so much. that andf the fact it is so much fun to build.

Anyway, on to the pictures:

Inquisitor Necromunda Terrain

Inquisitor Necromunda Terrain

And a model for scale:

Inquisitor Necromunda Terrain

At the weekend I had a game of Battlefleet Gothic and ended up rolling the ‘Surprise Attack’ scenario which required a number of planetary defences. Unfortunately I didn’t have any suitable models and so we had to make do with some asteroids standing in for defence platforms (we figured they would have small bases with weapons mounted on them). While this worked well enough I decided to build some specific models for future use. After a quick rummage through my bitz box (or rather, boxes) I hit upon the idea 0f using parts from Tau drones as the main platform.

Here’s what you’ll need:

  1. Top part of a Tau drone.
  2. Battlefleet Gothic x4 turrets.
  3. Battlefleet Gothic masts/sensors.

You’ll also need some putty or filler. I also used some half-circle plasticard strips although these aren’t essential.

Step 1

Fill in the recesses on the surface of the drone where the antennae are attached. I used MMD Green Putty for this but it doesn’t really matter what you use. Green stuff or Milliput would work just as well.

Step 2

Drill a hole in the centre of the drone. This is where you will attach it to a flight stand. I mounted mine on a piece of thick brass rod to match my ships (I find plastic flight stands far too flimsy) so I’ve drilled quite a large hole.

Step 3

Glue one of the masts in hole at the centre of the underside of the drone and add the turrets around the outer ring. This will require a little bit of filling to remove some of the details on the drones and the peg on underside of the turrets in order to get them to fit together smoothly.

Step 4

I then added some small pieces of half-circular plasticard rod to give the platforms a bit of extra detail to  break up the flat area around the edge.

So there we have it, a pretty simple yet effective way of making orbital defence platforms.

-Andy.


Yesterday afternoon I managed to finish airbrushing the second of my two Battlefleet Gothic boards and added some finishing touches to the first one. This was quite a quick project and I really enjoyed making the boards. It was great fun to try out something a bit different with my airbrush and paint a flat surface rather than a 3D model. However, if I were to do this project again I would probably do things a little differently as I’m not 100% happy with the boards but on the whole the project turned out quite well and has given me a nice surface to play on.

Some more pictures:


I’m currently working on a board for Battlefleet Gothic. I’ve played a few games so far and really enjoy the system so I thought it was time to get some terrain together (well, perhaps ‘terrain’ isn’t strictly the right word given that the OED defines terrain as ‘of the earth, terrene, terrestrial’ but lets not get bogged down in pedantry). So far I have painted up a 2’x4′ board to look like a space-scape. Above is a work-in-progress shot of the board which still needs details such as stars added.

What’s really nice about Battlefleet Gothic Terrain is how simple it is to make. The board is MDF which was painted with black acrylic paint using a paint roller. I then airbrushed on a nebula and a galaxy to add some visual interest using astronomy pictures as a reference. The board looks a little more crowded than a real space-scape would be but I’m aiming for visual interest rather than realism.

I also made some asteroids. These were also very simple to do and are simply lava rocks glued to flying stands. I simply copied the technique detailed in Carl Woodrow’s blog post so I won’t go into detail about the process here as it would only be repetition.

Finally, I made a planet. Again, this was very simple. It’s half of a polystyrene sphere purchased from an arts and crafts store. I gave it several coats of fine masonry paint in order to disguise the obvious polystyrene texture before airbrushing it in various shades of brown.

I have a game of BFG scheduled for Sunday so I’m hoping to get the board finished by then. Time to break out the airbrush.

-Andy.

Wooden House

I’ve finished constructing another building for my Mordheim table. This one is a wooden house. As with the other buildings the basic structure is made from foamcore which was then textured. Because I was using thick plastic card and balsa wood sheets for the exterior I used 3mm foamcore rather than 5mm so that the walls would not end up too thick. I chose a more rustic looking stone (Wills Random Stone) rather than the stonework I used on the tower house as this was more in keeping with the overall look of the building. By using a variety of different materials on my buildings I hope to achieve a more realistic look to the city as real cities are not uniform and different buildings are constructed from different materials  using different techniques.

Interior Detail

The interior is pretty straightforward so I won’t say much about it here. The floorboards were made from sheets of balsa wood with a pattern scored into them using a ruler and a pencil (the same technique was also used on the wooden exterior). Piles of rubble were built up using offcuts of foamcore which were covered with DAS putty and then had pieces of wood and roof tiles stuck into them. When dry they were covered with sand.

Up on the Roof

It’s worth saying a little about the roof tiles here. As with the cobblestones I use on my bases, these were purchased from Miniaco and were intended for dolls’ houses. The tiles are available in a variety of styles and colours and are made from reconstituted stone. I really can’t recommend these highly enough; they look very realistic and are easy to work with. They can be cut with a modelling knife or snapped with fingers. Although at first they seem a little fragile when glued down they are very sturdy. I used 1/24 scale tiles which were applied in layers starting at the bottom of the roof and working up. This was quite a time-consuming process as I had to wait for each row to dry before adding the next. There is nothing more frustrating than neatly gluing on a row of tiles only to knock them all off trying to add the next layer (as I found out by being impatient). The roof was topped off with some ridge tiles also from Miniaco. Although I intend to paint the roof, the tiles have a nice realistic look and could be left as they are.

I was planning on writing a tutorial on making buildings but I got carried away and forgot to take step-by-step pictures. With the next building I will try to remember and write a more detailed piece on the construction of the buildings.

All the best,

Andy.

Related Posts

The Ruins of Mordheim
Building Continues

Following on from yesterday’s post I’ve made some more progress on the ruined tower house. I’ve finished  texturing the walls of one of the side buildings with plasticard and added some plastic details from the Mordheim building sprue. I used Wills plasticard for the walls which proved quite difficult to cut and shape. It also comes in fairly small pieces and so I had to use two three to cover a wall and then fill in the gaps. I’m not sure if there is a better way kind of plasticard to use.

A photo with my Freelance Knight for scale:

All the best,

Andy.